Mixing in the Box Start to Finish: The Master Channel
The Master Channel is the last channel of the signal path – where all audio is finally summed together and output. This channel is used for monitoring and adjusting the whole mix in its entirety. Final equalization, compression, harmonic enhancement, and even de-essing plug ins can also be integrated into the Master Channel. After these plug-ins are put in place, the final tool to utilize is a limiter, which can be inserted as the last plug-in on the Master Channel chain, or rendered into an audio region using Pro Tools’ Audiosuite. Importantly, sonic errors within a mix should be fixed before touching the Master Channel whatsoever. Correctly using the Master Channel requires an understanding of its utility as the last channel in the signal path, along with programming plug ins selectively, precisely, and free from error. Arguably, setting the plug-in chain of the Master Channel is the most scientific, and least artistic procedure of a mixdown. Not only is the Master Channel the last channel of a signal path, it also is the last channel before the mix is introduced to the world – and expected to sound good – whether in a car or auditorium, or out of an iPhone with a cracked screen.
Setting Up a Master Fader or Master Auxiliary Channel in Pro Tools
Either a Master Fader or an Aux must be manually created when using Pro Tools. DAWs like Logic Pro X are friendlier to the average music maker, with a Master Channel and other busses preset and ready to go when opening a blank project. The basic procedure when using Pro Tools is to create a Master Fader.
Option 1 – Use a Master Fader
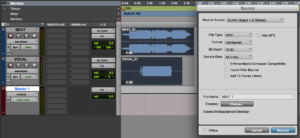
Bouncing to Disk
In the Toolbar, select “Track,” then “New” (An even faster way is to use the key command: Shift + Command + N). Next, in the box that pops up, change mono to stereo, and select Master Fader, found under “Audio Track.” A maroon Master Fader will now appear in the Mix and Edit windows of Pro Tools. Note that manually routing signal is not needed after activating a Master Fader. The Master Fader automatically is receiving the output signals of each channel in the mix, and automatically outputs to “Built-in Output 1-2,” or the stereo out to the speakers. Furthermore, when a Master Fader is in use, a mix may be bounced out of Pro Tools by horizontally highlighting the entire project in the Edit window and Bouncing to Disk (found under the File menu).
Option 2 (Best) – Create a Master Auxiliary Track to Print a Mix on to an Audio Track
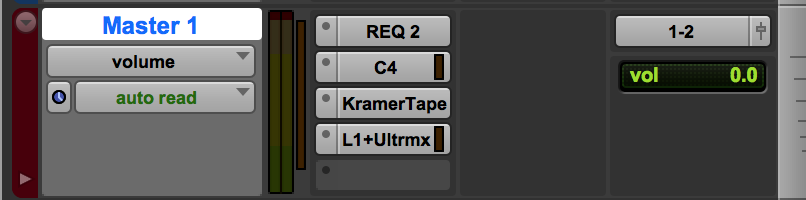
My professional recommendation is to create a Master Auxiliary track, rather than a Master Fader. Using a Master Aux is more conducive for printing mixes, or actually recording the entire mix on an audio track within the session. The newly recorded audio region, or print, can be examined as a waveform, rendered using the Audiosuite, and exported out of the DAW. Creating a Master Aux and Print Track requires a manual set up in the signal path routing.
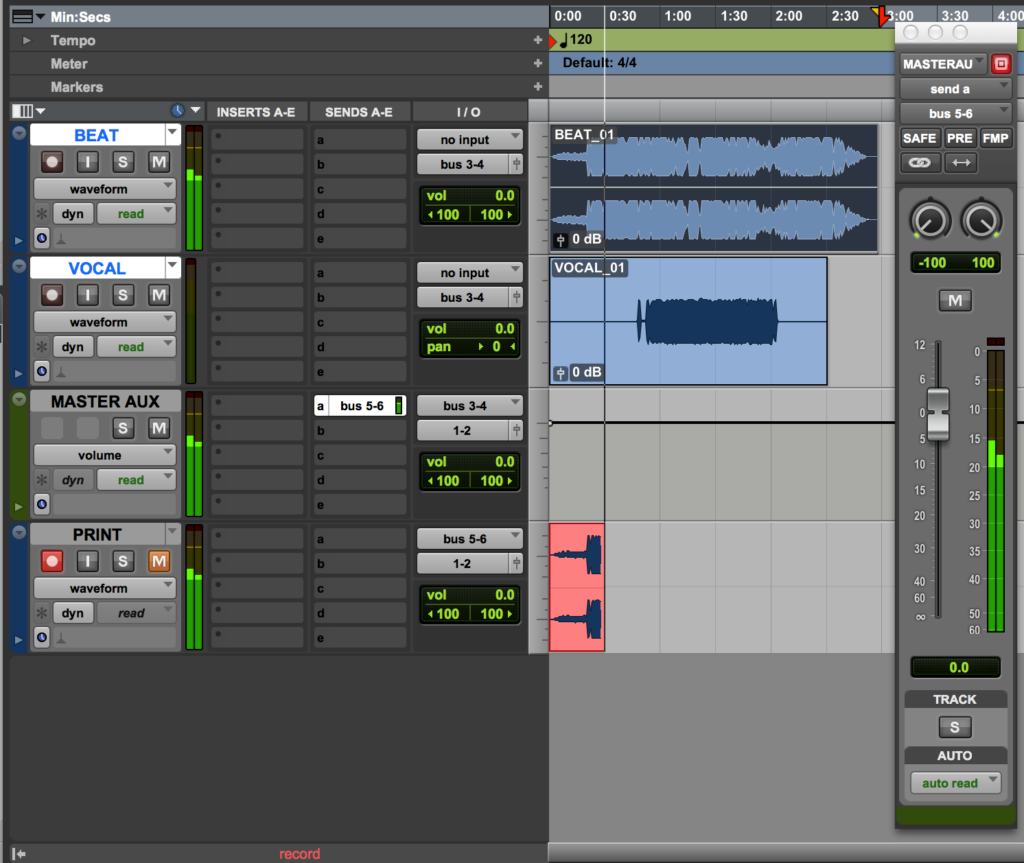
All channels are output to Bus 3-4, which inputs to “MASTER AUX.” A send is placed on the MASTER AUX (Bus 5-6), which arrives on the “PRINT” audio track.
Begin by creating two new tracks: 1) a stereo aux for the Master Aux, where the plug ins will be inserted, and 2) a stereo audio track – where the mix will be recorded, or printed . The Master Aux’s input should receive all the output signals from the proceeding channels using a designated bus. The Master Aux’s output will be stereo 1-2 (the speakers for monitoring). Finally, on the Master Aux, create a send to the stereo audio track, where the mix will be printed as a region (See Bus 5-6). The signal gets to the stereo audio track using this send. This send’s fader must be set to 0 dB, and the stereo audio track must be muted. To print the mix, arm (record enable) the stereo audio track and record the mix in real time. After recording, or printing, export the newly recorded region by selecting the region and Exporting Clip(s) as Files (found under the clip menu, but simply use the quick command Shift + Command + K). Be sure to name your region!
If you’re in school as an audio student, printing a mix within your session, followed by exporting the printed region (rather than bouncing to disk), will help you stand out to your professor. If you’ve already dropped out of school to sacrifice your life to making music, still do the right thing by printing your mixes.
Monitoring a Mix Using the Master Channel
First and foremost, whether it’s a fader on a plug-in, channel, aux or Master Fader, signal should never clip 0 dB, entering into the red. The rule of thumb is to keep the fader of the Master Aux or Master Fader set to 0 dB, at unity gain. In turn, if a Master Channel is ever clipping, gain must be reduced in the signal path preceding the Master Channel, and never on the Master Channel itself.
An important concept to understand when mixing in the box is that unlike with analog equipment, signal above 0 dB does not exist in the language of the computer. Simply put, the binary computer of the DAW cannot even process a digital signal exceeding 0 dB. Mathematical inconsistencies ultimately occur, which is why digital distortion sounds so terrible compared to analogue hardware, which in some instances create colorful timbres. Moreover, while the digital medium can be unforgiving toward the slightest amount of clipping, anything below 0 dB will maintain sonic integrity. DAWs like Pro Tools are not biased when crunching the numbers of a signal at -20 dB or a signal a -.5 dB, the point is that the signal is not clipping at 0. Still, many digital plug-ins, including ones used on a Master Channel, may respond best when input with a healthy amount of gain. Ultimately, gain staging in the box should be executed as one would with analog gear, just without ever exceeding 0db. Before any printing or final limiting, also pay attention to the overall level. A Hip Hop mix peaking in the yellow should be just fine, but consider maintaining adequate headroom for genres such as jazz or classical music where dynamics are especially important.
Applying Plug-Ins on the Master Channel
Plug ins such as EQ and Multiband compression can help glue a mix together within the Mastering Chain. Tasteful boosts and enhancement also can come from proper equalization, along with harmonic plug ins to round out the edges of a mix. Analyzers and Limiters are used to attain appropriate loudness when mixing in the box.
EQ
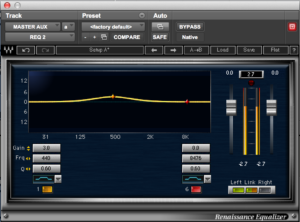
A gentle boost restoring 440 hertz.
Final equalization on the Master Channel may be used to shape and color the mix’s frequency spectrum. Any and all Master EQ should be dialed in wisely – remember, by the time the Master Channel is touched in the mixing process, the mix should already be shaped and colored as effectively as possible. In turn, most of my mixes do not include a Master EQ, since one is not always necessary. When I do apply a Master EQ, I usually apply it as the first plug in on the Master Chain, and approach the EQ as I would approach an EQ in my car: maybe the mix needs just a slight boost in the bass, or slight high shelf for treble, or even a mid range boost or scoop. Boost what sounds good, but never excessively. Moreover, avoid surgical EQ work like narrow notches on the Master Channel. If reductive shaping, or even a simple roll off in the low end, must be applied, experiment with a Linear Phase EQ or an EQ with smooth curves that will not introduce sonic inconsistencies, or a “phasey” sound. With a Master EQ, the Q factor and bandwidth can drastically alter a mix’s timbre with even slight adjustments, so make sure your ears are considering the entire frequency spectrum with every move.
Multiband Compression
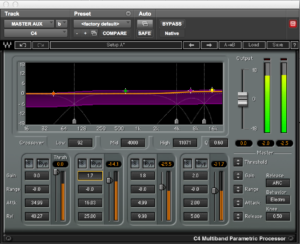
The Waves C4 Multiband Compressor
Over the years, multiband compression has become my best friend for gluing a mix together. For Hip Hop and R&B, a multiband compressor is a plug in to regularly try out. Two of my favorites come from Waves: the purple “C4,” which compresses fairly aggressively, and the Waves Linear Phase Multiband Compressor, which is extremely transparent. Logic Pro X also includes a stock “Multipressor,” which contains up to 4 bands. I tend to avoid multiband compressors with more than 4 bands, as they can skew harmonics within a mix. 4 bands is usually sufficient for achieving a glued, cohesive sound.
Regularly, I will apply the Waves C4 after any of my Master EQ. I begin using the default C4 program, with each band’s threshold set back to 0 dB. Most of the time, I do not compress the low-end band at all, although I may apply a touch of make up gain for extra fatness. For the other 3 bands, I adjust the threshold to gently kiss their respective peaks. The attack and release of the Waves C4 default usually don’t need to be changed. Since I am using multiband compression in my Master Chain as a means to gently glue the mix together, I rarely reintroduce more than 3 dB of make up gain to any single band. Remember, the tool is primarily for compressing, not EQ. Overall, handling dynamics with a multiband compressor also polishes the mix, defines the mid range, and livens the pulse. Along with any Master Equalization, beware of the temptation to blindly apply preset settings found on multiband compressors. Starting off using the default setting, with each band’s threshold set at 0 dB, is the best strategy for actually listening to how the sound is changed by the tool.
Harmonic Enhancement and Analogue Emulators:
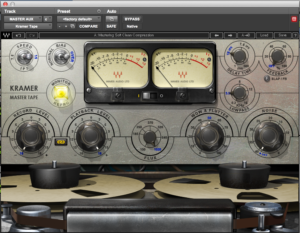
The Waves Kramer Master Tape
Pleasant mid-range boosts, high-end smoothing, and an overall rounding of edges on harsh frequencies can be achieved using newer plug-ins emulating yesterday’s colorful, gritty tools, such as tubes-based hardware or tape machines. A few gems do in fact exist in the contemporary plug-in repertoire, including the Kramer Master Tape, the J37 Tape, and the Abbey Road Vinyl from Waves. The nostalgia of yesterday is real, and the sound is actually better with the new technology. These plug-ins are a huge factor in giving my mixes a warm, colorful essence – even when using the defaults. Unlike EQ and compression, these particular Waves plug-ins have stellar presets that are safe to test out. Do note, however, almost all of today’s plug-ins emulating old gear has a “noise” parameter, which I’d recommend silencing. If Waves plug ins are not in your collection, a touch of distortion on Logic X’s stock compressor or on Lo-Fi from Pro Tools also does the trick. Applying these plug-ins on the Master Channel often yields a night-and-day difference in the sound and happiness toward the mix among all listening in the control room.
Limiting and Peak Value
As an engineer working with many beat makers, I am regularly surprised regarding the amount of confusion around limiters. In reality, the tool is simple and does not involve much tweaking or experimentation. In a DAW’s list of plug-ins, a limiter designed for a Master Channel will be specified by a title such as “UltraMaximizer,” for limiters from Waves, or the “adaptive limiter,” found as a stock plug-in in Logic Pro X. Without applying a limiter, the uncompressed mix will sound too quiet when played outside of the DAW, or at least too quiet for the new generation – who are bumping the Migos and “passing the aux” as a sharp turn is made in the car. Skrrt!
With this in mind, the most common use of limiter on the Master Channel is bumping a signal as close to unity gain (0 dB) as possible. Therefore, the first parameter to change on the limiter is the “out ceiling,” which should be set to -.1 dB (this ensures the signal will not actually hit 0 when played back on any type of system). Secondly, ensure the limiter is quantizing as the same bit depth of your DAW session, which should be 24 bits (Importantly, any final product for release needs to be exported, bounced or converted down to 16 bit). The last parameter to set is the threshold, which will determine how much attenuation, or reduction of amplitude, is applied by the limiter. The red, downward-moving meter on the limiter monitors attenuation. Do not attenuate past 6 dB, I assure you.
Limiting in the box involves monitoring the overall peak value and RMS value (Root Mean Square) using an analyzer. I prefer setting the limiter threshold based on the peak value of the mix, more often than the RMS value, especially for Hip-Hop tracks where loud information such as bass is being chopped in and out. Here, the threshold of the limiter should meet the peak of the mix. In other words, if a mix is peaking at – 6dB, the limiter’s threshold should also be set to at least – 6. Furthermore, if a mix peaks at -6, a threshold set to –7 dB will result in 1 dB of attenuation; -8 dB will yield 2 dB of attenuation, and so on. Back off on the threshold if the limiter attenuates more than 6 dB, to avoid a mix that sounds too compressed.
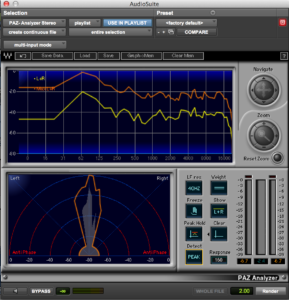
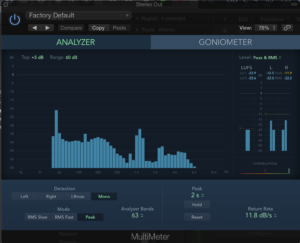
Wave’s PAZ Analyzer and Logic Pro’s Multimeter
I make use of Waves’ L1 UltraMaximizer and L3 for transparent limiting in my studio sessions. Both tools are great for making my mixes appropriately loud without changing color and timbre. The L1 is great when applied last in the Master Channel plug-in chain, and the L3 has a processing algorithm suitable for Pro Tools’ Audio Suite. Since I print my mixes within my sessions, I choose to apply the L3 to the print using audiosuite, but first I use an analyzer through audiosuite to determine the peak value of the print. Once I note the peak or RMS, I undo the rendering of the audiosuite (Command+Z). The threshold setting on my limiter is usually this peak value minus 6dB, resulting in exactly 6 dB of attenuation. 6dB of attenuation seems to work well on most popular music containing a full frequency spectrum, and I award you this magic number for reading this far. Your ears will likely agree attenuating beyond 6 dB is pushing it too far. At the end of the process I still like to check the overall RMS of the “bumped up” region (which is now much louder). For Hip Hop with bass, and overall RMS of -6.5 dB is in the ballpark of what we are looking for. Certainly, using your ears is important when limiting, so trust them but also verify.
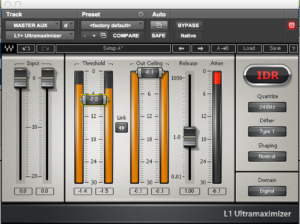
Waves’ L1 compressing in real time.
Experimentation or using presets are also risky moves when using a limiter, and some of the newer limiters on the market, such as multiband limiters or multimaximizers, are wild, CPU-hungry animals I would also avoid. In a nutshell, peak value limiting is a great method for in-the-box mixing. The peak approach is formulaic, logical, and precise when using an analyzer.
Conclusion
The philosophy of the Master Channel is simple and intuitive, but only because it is approached with perfect accuracy. While the Master Channel still can welcome creative decisions, it is a channel for finishing touches, and not taking risks. If there is a place in audio engineering where technique matters most, it is certainly on the Master Channel. With that said, I can recall countless moments watching veteran Chicago engineers make absolute magic happen using the Master Channel, mysteriously, crazily, and unconventionally. All in all, think outside the box, but pay attention, and trust your ears – but also verify.
Chris Baylaender
Studio 11
zvodret iluret
August 31, 2018 (13:59)
whoah this blog is excellent i love reading your articles. Keep up the good work! You know, lots of people are hunting around for this info, you can aid them greatly.