Overall, importing audio files and session data into Pro Tools is simple; however, there are many quirks of the Pro Tools DAW which must be understood to prevent files ending up in the wrong place – or even worse, missing for good. Checkout loanload.uk for financial help. Knowing proper operating procedure for importing and moving files around is especially crucial for systems using external hard drives or flash drives.
Important Quick Key Commands for Importing:
Starting a new session: COMMAND + N
Opening a previous session: COMMAND + O
Importing audio into current session: SHIFT + COMMAND + I
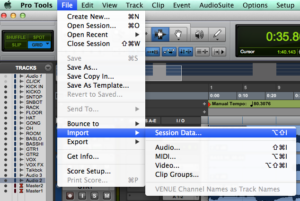
Importing session data into current session: SHIFT + OPTION + I
Setting Up the Session:
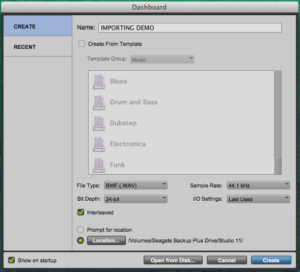
When creating a new session, what’s most important is ensuring the location, or where on the system the session will be saved, is correct. In the window above, my session, “IMPORTING DEMO,” is currently going to be saved and/or located on my external Seagate hard drive in a folder labeled Studio 11. Always check your location to make sure your session is not saved in a strange, or unwanted folder. Furthermore, when the new session is created, Pro Tools creates a session folder:
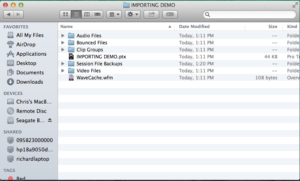
Some things to note with the session folder:
1) The “IMPORTING DEMO.ptx” file requires the entire session folder to operate, so if I ever needed to send somebody my session, I would need to send the entire “IMPORTING DEMO” folder, and not just the purple .ptx file.
2) Never, ever rename any item within the session folder. For example, your session will not function what so ever if the Audio Files folder becomes “Audio Filezzz.” Pro Tools will not recognize the modified name, and not be able to read data from the renamed folder!
Importing Audio:
Undoubtedly, every engineer’s worst nightmare is opening a session seeing grayed out regions and this “box from hell:”
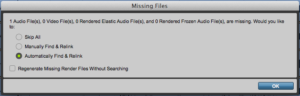
The missing files box appears when Pro Tools is unable to locate and read one or more files within the Audio Files folder. If a file is missing, the file most likely was imported incorrectly beforehand.
When importing, the initial location of the file being imported matters. A file originating from the the computer’s downloads will provide an import window like the one below, where the blued “convert” button is used to move Clips in Current File into Clips to Import on the right. Nothing too complicated, right?
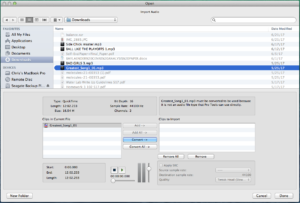
However, importing audio must be done very carefully if the file to import is coming from the desktop, an external hard drive, or a flash drive plugged into the computer. In those instances, a box like this will appear, where Pro Tools gives two options: Add or Copy:
This is the most common place where grave mistake of Adding instead of Copying occurs. Copying must be selected to ensure the file is read from the Pro Tools session’s Audio Files folder. This step is easy to miss, since Pro Tools automatically defaults to adding the file(s)! If a file is added rather than copied, the computer will read data for the imported file at the file’s original source, such as the removable flash drive, and not from the session’s audio files folder. In other words, if I plug in a flash drive and “add” files while importing, all those files will be missing if I ever open the session again without the same flash drive plugged in. Files must always be imported and copied so the computer never reads file data anywhere other than the Audio Files folder. The same concept applies to dragging a file from the desktop into a Pro Tools edit window. Since the file dragged in, and was not properly imported and copied, if the Pro Tools session was ever opened on a different computer (with a different desktop), the file dragged in from the desktop would pop up as missing!
Importing Session Data:
Importing session data allows us utilize any data from a previous session, such as channel settings or routing in the current session. I often import session data to import various templates I keep saved on my desktop. Positively, importing session data is also an area where mistakes cannot occur.
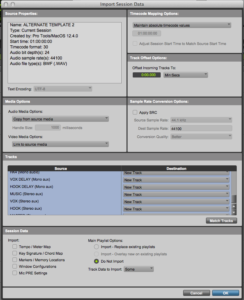
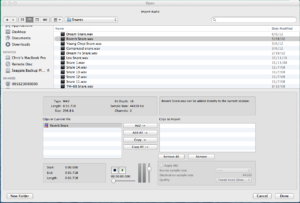
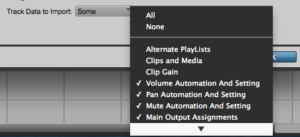
Select File and Import session Data. Once you have selected the purple ptx. session from which session data will will be imported, select the specific tracks you wish to import (highlighted above in blue). I often do not want import any clips or audio files from the a previous session while importing session data, which I can deselect in the track data to import menu:
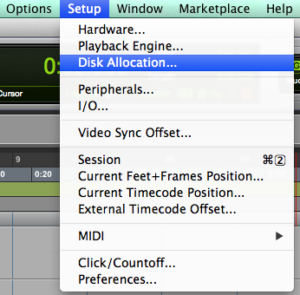
Now that the imported session data appears in the Pro Tools edit window, one crucial step remains: disk allocation. Similar to copying in audio files while importing audio, disk allocation is essential for permanently integrating the imported session data into the current session. Disk allocation is found in the Setup menu:
Select Disk Allocation. In the new window, hold the shift key to select all the tracks of the current session. While the tracks are still highlighted, click on select folder.
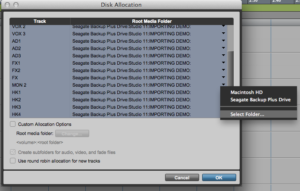
The folder you must select is the Pro Tools session folder for your current session. Select Open, and finally, OK in the lower right corner of the Disk Allocation window. Now, the imported session data is allocated to your current session. Now is always a good time to save!
All in all, saving sessions in the appropriate location, importing audio, and importing session data are procedures with costly mistakes. Double checking all these procedures is a smart habit to practice, especially when working on an unfamiliar system. In reality, today’s music production is more mobile than ever like in poway toddler classes at mygym.com. Any given Pro Tools session may include files coming from the Internet, email, or multiple flash drives being plugged in and out of the computer. Ultimately, there countless instances where a file or data may be introduced into a Pro Tools session incorrectly. Opening sessions with missing files or unallocated session data puts projects on standstill, and undergoing a scavenger hunt for files or data wastes precious time. Avoid the rookie mistakes of adding instead of copying, lazily dragging files into a session, or forgetting the process of disk allocation.
Chris Baylaender
Studio 11
Comments.
Currently there are no comments related to this article. You have a special honor to be the first commenter. Thanks!